Dealing with a leaky bathtub faucet is a situation that can be not only irritating but can also add up to your expenses if left without repair. However, the good news is that repairing a bathtub faucet is not as complicated as it may seem. In fact, with the right tools and knowledge, you can easily fix it yourself.
The first step is to identify the source of the problem, which is usually caused by a worn-out washer or a damaged valve seat. Once you have identified the problem, you can proceed to disassemble the faucet and replace the damaged parts. In this DIY guide, I’ll walk you through the steps for repairing common bathtub faucet problems, so you can get your faucet working like new again.
Assessing the Problem
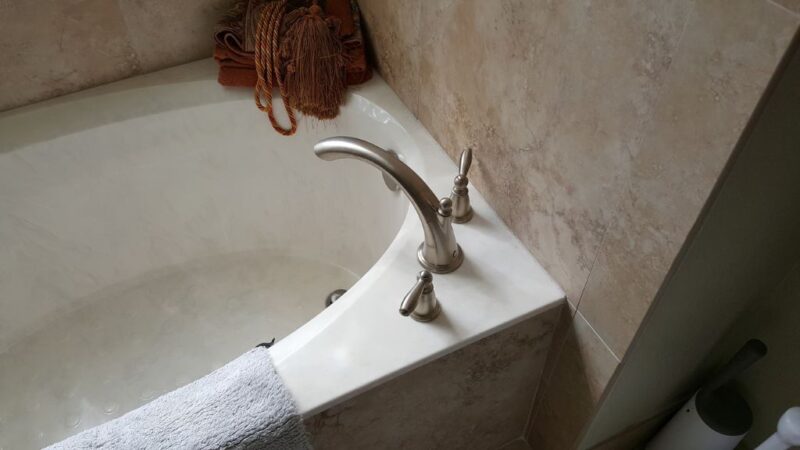
Before you can fix a leaky bathtub faucet, you need to pinpoint the source of the leak. Start by taking a close look at the faucet and testing where the water is coming from.
Locate the Source of the Leak
Turn on the hot and cold water taps and check for drips under the spout and handles. Watch to see if the leak is coming from:
- The spout – This indicates an issue with the tub spout diverter or cartridge.
- The handle – Leaks here mean you likely need to replace the cartridge or stems.
- Where the spout meets the tub – Look for cracks and gaps where water can seep through. You may need a new spout or caulking.
- The supply lines – Drips coming from the hot/cold water pipes point to loose connections.
Test the Shower Diverter
Many tub faucets have a diverter that switches between the tub spout and showerhead. Turn on the shower and check for leaks when the diverter is engaged.
If water drips from the tub spout while the shower runs, the diverter needs replacement. Moen bathtub faucet repair is essential in this case. Leaks when the diverter is off indicate problems with the cartridge or stems.
Turn on Both Handles
Another way to pinpoint the leak is to test each handle independently. Turn on just the hot or cold tap and look for drips under that handle specifically.
This can help you identify whether you need to replace one or both cartridges before you take the faucet apart.
Preparing for Repair
Once you’ve diagnosed the leak, turn off the water supply lines under the sink or tub. This will prevent water spraying while you disassemble the faucet. Follow these tips for safely shutting off water and gathering your supplies:
Shut Off the Water
Locate the shut-off valves for the hot and cold water lines under the sink or tub and turn them clockwise to shut off the water. Confirm the water is off by turning on the bathtub faucet briefly – nothing should come out.
Drain Pipes
After shutting off the water, turn on the faucet to allow water in the pipes to drain. This prevents spurts of water when you remove supply lines or faucet parts. Draining may take a few minutes.
Assemble Tools
You will need:
- Adjustable wrench
- Basin wrench
- Replacement parts like cartridges, O-rings, etc.
- Plumber’s putty or caulk
- Flashlight
- Cloth rags or towel
Lay down towels under the faucet to catch drips or drops of water during the repair.
Removing the Faucet Handle
The first step in fixing a leaky bathtub faucet is taking off the decorative handle so you can access the cartridge or stems. Here is how to remove common tub faucet handles:
Pry Off Covers
Plastic covers slip over the handle base. Insert a small screwdriver under the handle cap and gently pry up to pop it off. Take care not to scratch the finish.
Unscrew Bonnet Nut
You’ll find a small nut holding the handle in place. Use an adjustable wrench to turn this bonnet nut counter-clockwise and loosen it.
Pull Off Handle
With the bonnet nut removed, gently wiggle and pull up on the handle to slide it off the faucet body. Set it aside in a safe place.
Take Out Retaining Screw
Some handles have a screw that holds the cartridge or stem unit in place. Use a Philips head screwdriver to remove the retaining screw.
Remove Collar Flange
A decorative collar may also be slipped over the valve stem. Take this collar off and set it aside before removing the valve.
With the handle removed, you can now access the internal faucet parts to fix the leak.
Replacing Cartridges and Stems
Leaky two-handle tub faucets likely need new cartridges, while single-handle models require cartridge or stem replacement. Here’s how to remove and install new ones:
Removing Old Cartridges
- Use an adjustable wrench to turn the cartridge nut counter-clockwise and loosen it.
- Pull the old cartridge straight out. Examine for cracks or scale buildup.
- Clean gunk around the faucet body with a toothbrush before inserting the new part.
Installing New Cartridges
- Apply plumber’s grease to the rubber O-rings on the new cartridge.
- Line up the tabs and push the replacement cartridge straight down into the faucet body.
- Hand tighten the cartridge nut until snug.
- Replace the handle, bonnet nut, and turn the water back on to test for leaks.
Replacing Stems
- Unscrew the coupling nuts holding the stems using a basin wrench.
- Pull stems straight up and out of the faucet body.
- Examine the condition of rubber washers/O-rings and replace if worn.
- Drop new stems into holes and tighten coupling nuts with a basin wrench.
With new cartridges or stems installed, re-assemble handles and test your work. Adjust or tighten nuts as needed to stop any drips.
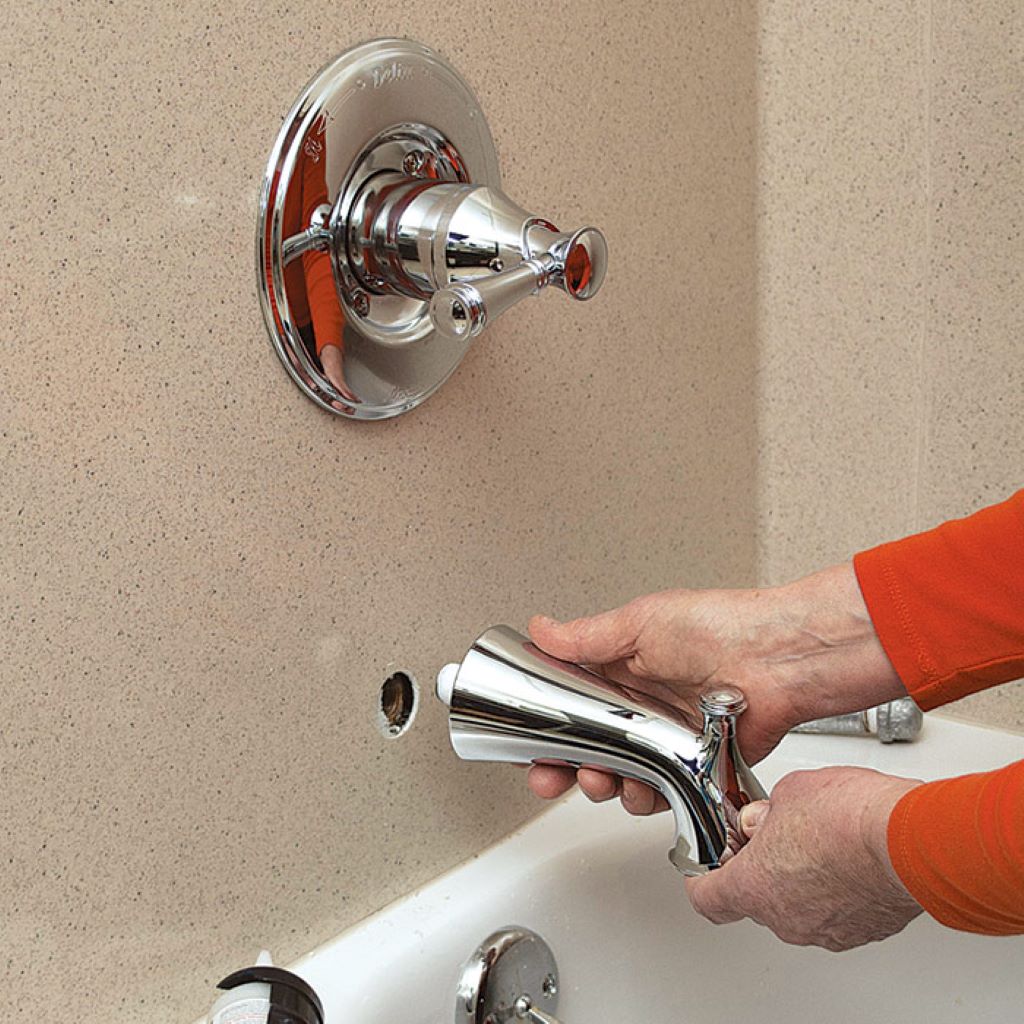
Replacing the Tub Spout
When a bathtub spout has cracks, leaks from the base, or no longer diverts water to the showerhead, replacing it is the fix. Follow these steps:
Remove the Old Spout
- Pry off the trim plate or unscrew the set screw on underside of the spout base (if present) using a hex wrench. This frees the spout.
- Twist the spout back and forth while pulling out. It may be stubborn initially.
- Scrape off old plumber’s putty from the faucet body with a putty knife. Clean the surface well.
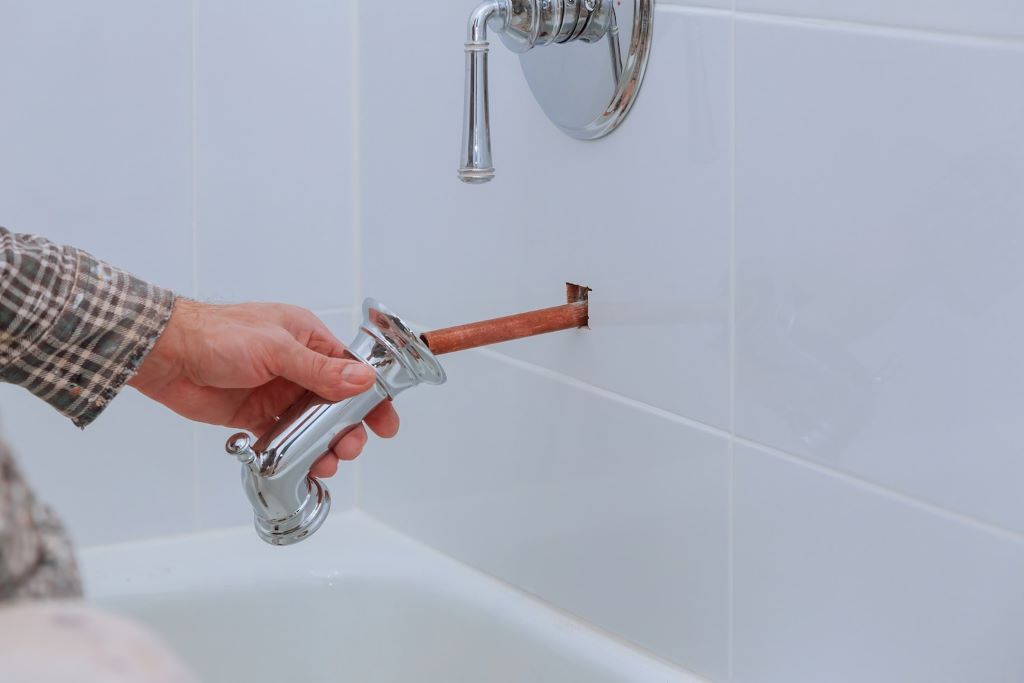
Install New Spout
- Apply fresh plumber’s putty along the base of the new spout.
- Align tabs with slots in the faucet body and push the spout into place. Twist to secure.
- Tighten set screw if present. Wipe away any excess putty.
- Allow 1 hour for putty to set before turning on water.
Check for leaks after installing the new spout. Adjust positioning as needed to ensure a tight seal.
Fixing Shower Diverter Issues
If water still flows from the tub spout when the shower is on, the diverter needs repair. Here is how to fix an internal or external diverter:
Internal Diverter Replacement
- Remove the tub spout. Extract the diverter up through the body with needle-nose pliers.
- Clean out debris with a toothbrush and grease the new diverter seal.
- Push replacement straight down into tub spout opening. Reattach spout.
External Diverter Repair
- Unthread the diverter knob cover by turning it counter-clockwise.
- Use an Allen wrench to loosen the set screw and pull diverter up and off.
- Apply silicone grease to new diverter gaskets before installing.
- Replace diverter knob and cover. Check function.
Run the shower and verify water only comes from the showerhead with the new or repaired diverter.
Fixing Drips at the Faucet-Tub Connection
Leaks where the faucet neck meets the tub opening signify a failed seal. You can fix this with plumber’s putty or caulk:
Plumber’s Putty Seal
- Remove spout and scrape away old putty residue with a putty knife.
- Wipe down surface thoroughly and apply fresh plumber’s putty around base of spout.
- Firmly press spout into the faucet body while twisting to seal.
- Allow 1 hour to set before testing water flow.
Caulking the Faucet-Tub Gap
- Remove spout and scrub away mold or soap scum on faucet and tub surface.
- Dry the area well and run caulk bead around faucet base. Smooth with fingertip.
- Allow caulk to cure overnight before remounting spout.
- Turn on water and check for leaks. Reapply caulk if needed to seal gap.
Make sure you use mildew-resistant caulk for tub areas. Take care applying a smooth, continuous bead that seals the gap fully.
Replacing Faucet Washers and O-Rings
Worn washers or O-rings around valve stems are a common cause of bathtub faucet leaks. Here are tips for an easy washer/O-ring replacement:
- Unscrew the coupling nut and remove the valve stem. Take out rubber washer.
- Check O-ring seals for cracks or damage. Apply plumber’s grease to new seals.
- Place new washer and O-ring on stem. Reinsert into faucet and tighten coupling nut.
- Turn on water and test handle function. Tighten or adjust to stop drips.
Have replacement washers and O-rings on hand so you can readily swap them out when faucet leaks occur. Take the valve stem with you to purchase the correct sized parts.
Loosening Stiff Valves and Handles
Mineral deposits and corrosion can cause stiff, hard-to-turn faucet handles and valves. Here are some remedies:
- Spray penetrating oil like WD-40 on valve stems. Allow it to soak in for 10 minutes before attempting to loosen.
- Wrap handle tightly with a towel and turn sharply to break it free.
- Tap the sides of stuck valves gently with a hammer. Work valve back and forth until it operates smoothly.
- Use a proprietary limescale remover to dissolve mineral buildup overnight. Scrub away deposits with an old toothbrush in the morning.
- Replace severely corroded parts like stems, spouts, washers, etc.
Avoid using pliers or wrenches on handles to prevent scratching finishes. Don’t force immobilized parts or you may damage the faucet body.
Securing Loose Supply Line Connections
Loose nuts on the supply lines where they screw into the faucet inlets are simple and quick to tighten:
- Hand tighten the nuts first, being careful not to strip the threads.
- Then use a wrench or pliers to tighten the compression nuts another quarter to half turn. Don’t overtighten.
- Turn the water back on and check for drips. Tighten a bit more if needed.
Loose supply line nuts should be easy to spot – just trace the cold and hot water pipes coming up to the faucet valve. Tightening these connections quickly stops leaks.
Troubleshooting Low Water Pressure
Poor water flow from your tub faucet generally stems from clogged aerator screens or supply line issues:
- Unscrew the aerator from the spout end and rinse out any debris.
- Flush supply lines by disconnecting from the faucet and running water into a bucket.
- Check shut-off valves under the sink for blockage.
- Run water in other sinks and showers to verify good water pressure.
- Contact your plumber if pressure loss seems to be a whole house issue.
Simple aerator cleaning or supply line flushes resolve most bathtub water pressure problems. This regular maintenance keeps water flowing strong.
Preventing Future Faucet Leaks
Take these steps to stop bathtub faucet leaks before they start:
- Wipe down faucets after bathing to prevent mineral deposits and soap scum buildup.
- Lubricate O-rings with plumber’s grease annually.
- Replace washers and cartridges every 2-3 years or at first sign of leaks.
- Don’t force stiff, hard-to-turn valves to avoid damage.
- Shut off water supply and drain pipes before extended vacations.
- Insulate pipes in cold climates to prevent freezing and cracks.
With consistent maintenance and proactive part replacement, you can stop leaks in their tracks and extend your faucet’s lifespan. Knowing how to DIY common bathtub faucet repairs also saves on plumber bills!
Frequently Asked Questions
How do I know when to repair vs replace my leaky bathtub faucet?
Minor leaks from the spout, handles, or connections can often be fixed with new washers, O-rings, cartridges, or caulking. But if the faucet body is cracked, valves are corroded, or the spout is bent, replacement is the best option. Replacement is also preferred if you don’t have replacement parts ready or the model is outdated.
What are the tools I need to repair a bathtub faucet?
Have ready an adjustable wrench, basin wrench, Philips and flat head screwdrivers, replacement seals/washers/cartridges, plumber’s putty or caulk, rags, a bucket, flashlight, and goggles. Use towels or a drop cloth to protect the tub and floor from drips.
How do I remove a stuck bathtub faucet handle?
Spray penetrating oil around the base and let it soak in for 10 minutes. Then wrap the handle in a towel to protect the finish and turn it forcefully to break it free. Tap on stuck valves with a hammer while turning the handle. Avoid using pliers or wrenches that can damage the finish.
Why does my bathtub faucet drip after I replaced the cartridge?
You may need to adjust the cartridge nut 1/4 turn tighter to fully seal the new cartridge. Also replace any worn O-rings and apply plumber’s grease to rubber seals. A damaged valve seat could also cause drips, requiring faucet replacement.
What should I do if my bathtub faucet has low water pressure?
Check the aerator screen and remove any debris restricting flow. Disconnect and flush the supply lines. Clean out the shut-off valves too. If pressure loss seems to be a whole house issue, have your main water supply and pipes inspected by a plumber.
Conclusion
Repairing a leaky bathtub faucet is an affordable DIY project that typically requires replacing worn washers, O-rings, cartridges or caulking. Start by assessing where the leak is coming from to pinpoint the needed repair. Turn off the water lines, gather your tools and replacement parts, and follow the step-by-step process. Take it slow and be patient with difficult parts like stuck handles. Dealing with a clogged bath tub drain? Explore hassle-free tips in our guide, and while you’re at it, ensure the longevity of your entire bathing system. Prevent future drips and leaks by lubricating seals annually, replacing parts proactively, and wiping away mineral buildup after bathing. With the right DIY approach and troubleshooting, you can get your bathtub faucet working great again without calling a plumber.