Heavy duty backdrop stand is convenience. You can easily switch between different backgrounds and settings using these stands, which helps you create a polished and consistent look for your content.
Why Do You Even Need A Backdrop Stand
The benefits of using a backdrop stand are numerous, including improved lighting control, enhanced depth of field, and better focus on the subject. By using a high-quality backdrop stand, you can achieve a more professional appearance for your photos and videos, and demonstrate your expertise and attention to detail. So, if you’re looking to take your photography or videography to the next level, investing in a top-notch backdrop stand is worth considering.
Portraits
Tired of taking pictures in front of messy or distracting backgrounds? A backdrop stand lets you create a clean, solid color background that makes the subject pop. Say goodbye to awkward photobombers!
YouTube Videos
YouTube is all about the visuals. A backdrop instantly makes your videos look polished and put-together—no more distracting walls or clutter.
Zoom Calls
If the inside of your home looks like the set of a disaster movie, a virtual backdrop can make your Zoom calls look 1000x more professional. Impress your boss with the illusion that you’re an organized human being!
Product Photography
Trying to sell stuff online but your tabletop pictures look sad and amateurish? Let a seamless backdrop give potential customers the impression you’re a legit businessperson.
See what I mean? Backdrop stands open up a ton of possibilities. Now let’s get you set up with one!
Choosing The Right Backdrop Stand
Backdrop stands come in a range of shapes, sizes, and designs. Let’s break down the options:
Floor Stands vs Wall Mounts vs Ceiling Sets
The first decision is how you want to set up your backdrop. The three main choices are:
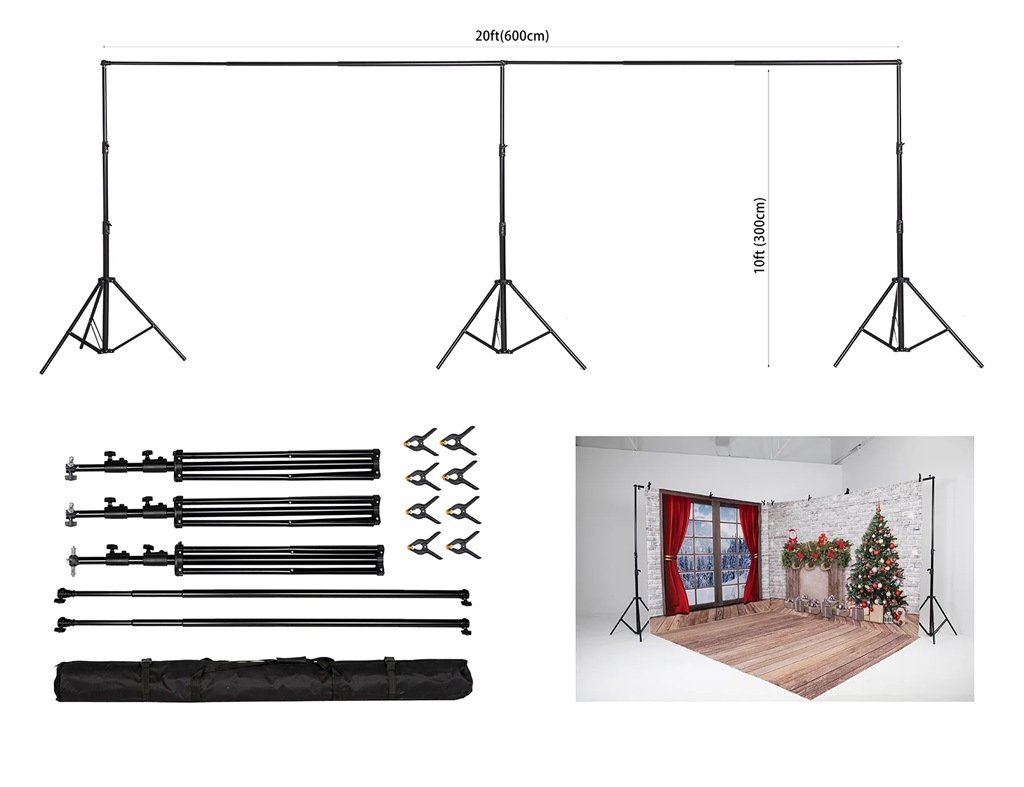
- Floor stands Free-standing metal frames that you can position anywhere—most versatile option.
- Wall mounts: Attach directly to your wall for a fixed background. Best if you need the backdrop in one consistent spot.
- Ceiling sets: Suspend your backdrop from cables attached to the ceiling. Gets the backdrop fabric out of the way for open floor space.
Floor stands are usually the best bet for beginners since you can move them around easily. Wall mounts or ceiling sets work better once you know exactly where you want to permanently install them.
Background Size
Next, think about what size backdrop you need. The most common options are:
- 5 x 7 ft – Great for waist-up portraits
- 8 x 8 ft – Allows some extra space around the subject
- 10 x 10 ft – Ideal for full body shots
There are also larger options like 10 x 20 ft or even bigger if you need them!
I’d recommend getting an 8×8 ft or 10×10 ft backdrop to start. It will have you covered for most basic shooting needs. You can always size up or down from there.
Heavy Duty or Portable
You’ll also see backdrops stands sold as either “heavy duty” or “portable.”
- Heavy Duty – Sturdier, steel frames that support more backdrop weight. Ideal for studios.
- Portable – Lighter aluminum and alloy frames that collapse for easy transport. Better if you’re on the move.
Since we’re talking heavy duty stands here, let’s focus on what to look for in that department…
Key Features of Heavy Duty Stands
The best heavy duty backdrop stands share a few common traits:
Adjustable Height – The frame should telescope up and down several feet to accommodate different heights.
Steel Construction – Steel provides maximum durability for regular use. Aluminum telescopes more easily but dents and bends over time.
Sandbag/Counterweight Compatible – You’ll want a stand with hooks or poles to attach sandbags to prevent tipping. More on that later!
High Weight Capacity – Double-check check it can handle heavier fabric backdrops. Aim for at least 30 lbs capacity.
Got those basics covered? Great! Let’s get your backdrop set up now!
Setting Up Your Backdrop Frame
You’ve unpacked all the pieces from the box, now what? Let’s assemble this thing:
Step 1: Extend The Legs
The legs will arrive and collapse inward. Simply loosen thumb screws or locking mechanisms, then gently extend the legs out to full width.
Pro Tip: Spread legs into a wide pyramid shape for maximum stability.
Step 2. Lock Cross Bars
With legs fully extended, attach horizontal crossbars between the tops of each leg. Lock twist clamps or thumbscrews firmly to secure crossbars in place.
Step 3. Adjust Height
Use the telescoping function to raise the frame to the desired backdrop height. Most floor stand heights range from around 6.5 ft to over 9 ft.
Step 4. Attach Backdrop
Drape your fabric backdrop over the frame, allowing it to unfurl downwards on both front and back.
Use backdrop clamps or clips to secure the top edge of the fabric to horizontal crossbars. Pull fabric smooth and tight.
Helpful Hint: Set up the backdrop so the print side faces towards the front of the frame.
And that’s the basics of constructing the frame! Make sure to extend those legs nice and wide, lock the crossbars tightly, get the height dialed in, and use clamps to secure the backdrop fabric smoothly.
Now you’re all ready to start shooting, right?? Almost!
Prevent Faceplants: Weighting Your Stand
Before you go taking any sweet selfies in front of a 10×10 ft sail of fabric, we need talk about one critical safety step:
Adding weight to prevent faceplants (or backdrop squashing, in some cases).
Here’s the deal: Backdrop stands act basically like a giant canvas kite waiting for a gust of wind. If they’re not weighted properly, you run the risk of them crashing down, taking lights/gear/people with them.
Very embarrassing, possibly hazardous.
So how much weight do you need?
Calculating Weight Minimums
General rule of thumb is you want at least 25% of the total weight of your backdrop fabric added to lower stand crossbar.
Let me demonstrate:
- Your 10×10 muslin backdrop weighs 15 lbs.
- 25% of 15 lbs is about 4 lbs.
- So you need at least 4 lbs attaching weight to stand.
Got thicker vinyl, canvas, or other heavyweight backdrops? Make sure you calculate for their higher fabric weight.
Attaching Sandbags or Counterweights
Once you know the minimum weight needed, simply hang or attach sandbags from the bottom crossbar.
Pro sandbagging tips:
- Use individual 10-20 lb bags for modular control
- Strap sandbags neatly to avoid trip hazard
- Secure bags to frame hooks, clamps, or poles
- Adjust bags symmetrically to keep stand balanced
Some stands may have dedicated rods or poles for attaching counterweights like dumbbell plates too.
Lighting Gear Warning: Hanging too much equipment off a floor stand can still create a tipping risk! Set up separate light stands whenever possible.
Nail the weighting and you’ll have a rock solid backdrop setup ready for action.
Creating Seamless Backgrounds
Once your backdrop stand is primed, you can start playing around with different background looks.
Here’s a few easy ways to take it up a notch:
Overlap Multiple Backdrops
Overlap two backdrops to create color gradients. Secure the top of one fabric to the midline of another to blend tones seamlessly.
Use Printed Canvas or Vinyl
Get bold abstract patterns, faux wood/marble textures and more with printed photo canvas or vinyl backdrops. More vibrant than fabric!
DIY Custom Prints
For totally one-of-a-kind prints, design your own backdrop digitally and order custom fabric prints. The options are endless.
Curve It Around Corners
Wrap backdrop over wings or stands at 45 degree angles to simulate walls/rooms. Mask edges in post for sleeker look.
See what I mean about options? With a solid backdrop stand, you’ve got infinite possibilities to build custom sets.
Now let’s put it to work with some…
Creative Photography & Videography Tips
You’ve got this sick backdrop frame all steadied and draped. What can you actually DO with it? Tons!
Depth and Dimension
The flat, single-tone nature of seamless backdrops makes your subject instantly stand out in 3D. Take advantage by shooting from funky off-angles to accentuate depth and shape.
Color Experimentation
Backdrops allow easy color scheme changes on the fly. Test out chromatic vibes ranging from high key whites to moody saturated hues.
Play With Shadows & Silhouettes
Sidelights on backdrop fabric cast angular, graphic shadows. Create striking outlines by positioning subject directly against the light too.
Clear Negative Space
Clean backdrops mean zero distracting background elements. Use to focus viewer’s eye solely where you want it.
See? So much creative possibility! And that’s not even getting into video techniques…
Cinematic Looks on a Budget
Seamless backdrops let you mimic Hollywood lighting setups on an indie budget. Use moody colors and contrast to set dramatic tones.
Zoom/Skype Broadcast Quality
No more awkward bedroom views! Airy solid backdrops keep attention on YOU, not your messy surroundings.
Have fun with mixing colors, getting artsy angles, faking cinematic lighting and more. Backdrops open up a whole new world!
Putting It Away Properly
Yes, I’m your mother now and I’m telling you to clean up after yourself!
When session’s wrapped, follow this checklist to teardown safely:
🔘 Remove backdrop from frame
🔘 Gently collapse frame legs inward
🔘 Telescope frame to shortest height
🔘 Carefully uninstall sandbags
🔘 Neatly coil electrical cords
🔘 Disassemble lights if needed
Whew, alright! Give everything an orderly pack down and your backdrop gear will be happy campers next shoot day.
…One more thing! To keep backdrops looking pristine:
👉 Hang fabric evenly to prevent stretching
👉 Allow to fully air dry if cleaning
👉 Never machine wash or bleach
👉 Avoid touching print surface
Treat your high-quality backdrop fabrics right and they’ll deliver beautiful, seamless images every time.
Phew, that was a boatload of backdrop knowledge dumped on you, wasn’t it? Let’s recap the key points:
Backdrop Stand Benefits
- Portable backgrounds for professional location shots
- Visually consistent image backgrounds
- Easily change colors/prints between shoots
- Block out distracting environments
- Create custom prints & looks
Choosing Stands
- Floor frames are most adjustable/durable
- 5×7 to 10×10 ft suit most needs
- Heavy duty holds more weight safely
Setup Best Practices
- Extend legs fully + lock crossbars
- Use 25% fabric weight for weighting
- Sandbags to lower poles evenly
- Smooth/straighten fabric print-side out
Getting Creative
- Play with dimension, color, and angles
- Incorporate shadows and textures
- Imitate cinematic lighting effects
- Keep backgrounds clean and clutter-free
So hopefully now you’ve got all the tools to set up a pro-level backdrop stand and take your photos and videos up a notch!
Excited to see what cool shots you dream up. Now go out there and get imaginative!
FAQs
What’s the best material for backdrops?
The most common options are muslin, canvas, and vinyl. Muslin is lightweight, affordable, and easy to transport. Canvas adds more texture and durability. Vinyl has the most vivid printed graphics but wrinkles easily.
How do I prevent wrinkles in the backdrop?
Wrinkling happens when backdrops lack proper support. Make sure to extend the stand legs fully, lock the crossbars tight, weigh the base evenly, and use enough clamps across the upper frame ledge. Pull fabric very smooth and taut.
Can I hang lights on the backdrop stand?
Technically yes, but it’s risky. Attaching too much extra weight to stand opens the chance of tipping failure. Set up separate light stands whenever possible instead.
What’s the easiest DIY backdrop?
Blank walls make great plain backdrops in a pinch! For quick color, tape or pin large sheets of construction/butcher paper to the wall + light evenly. Voila – cheap seamless background alternative.
How do I prevent backdrop shadows on the floor?
To minimize backdrop shadows on your set floor, position the key light above and several feet in front of the subject, while keeping backdrop lights very tight and angled towards the fabric. Flags/baffles help too.
Final Tips
Looking to create stunning, professional-grade photos? Look no further than this complete guide to selecting, setting up, and creatively shooting with heavy-duty backdrop stands. With tips on stand types, safety weighting, fabric care, and visual techniques, you’ll be well on your way to producing gorgeous, eye-catching images in no time.
To get started, it’s important to weigh your stands to prevent collapses properly. Additionally, it’s crucial to keep in mind the backdrop material types and sizes you’re working with. Embracing the latest trends in interior design involves not only staying attuned to contemporary styles but also paying attention to the meticulous details, such as always ensuring a smooth and secure presentation of fabrics with the print-side out to prevent wrinkles or blemishes. Additionally, don’t shy away from infusing creativity into your design choices, playing with depths, textures, and colors to bring a sense of depth and visual interest to your living spaces.