
Origami is an ancient Japanese art of paper folding. Origami is a perfect way to learn about the world of mathematics and science, but it is also a great way to create amazing models of animals, flowers, and other designs.
Origami dragons are a popular origami design and can be made in a variety of ways. This tutorial will show you how to make a basic dragon using just a few folds of paper.
Things you need how to make a dragon in origami
Paper: You will need some regular paper, origami paper, and a pencil
Scissors: You will need some scissors to cut the origami paper into the right shape
Glue: You will need some glue to attach the pieces of the dragon together
Ruler or measuring tape: To make sure your dragon is the right size
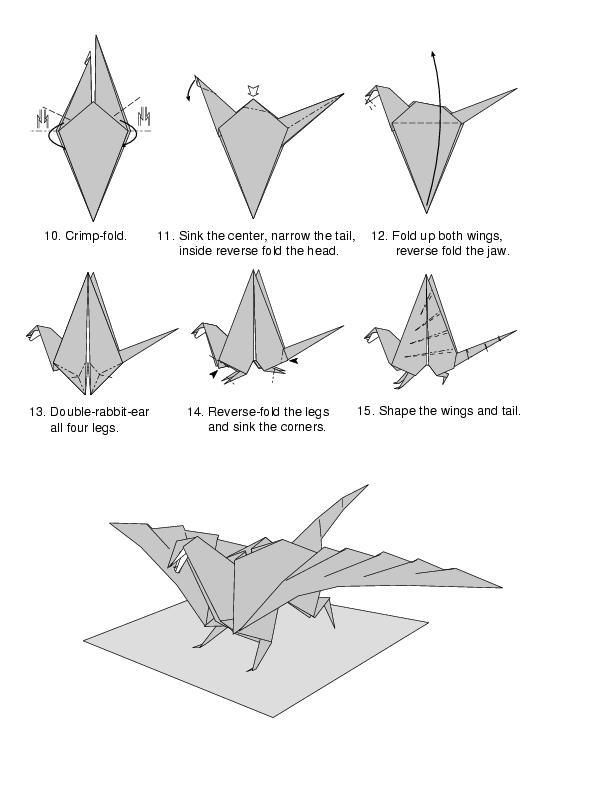
How to make a dragon in origami
Start by making a basic square origami paper sheet. Make sure that the length is equal to the width and the height is equal to the depth of your desired dragon body. Begin by folding in half the bottom edge of your paper, so that it meets in the center of your square origami sheet. Crease this fold, then unfold it so that you have a new bottom edge. Do this again with the top edge of your origami sheet, so that you now have 2 new folded edges. Learn more about how to make a heart out of a gum wrapper on girlydaily.com
Fold the bottom edge of your paper in towards the center, so that it meets up with the other new folded edges. Crease this fold and unfold to make a new bottom edge. Fold the bottom edge of your paper back down along its original line, but be sure to crease it in half so that you have a new bottom edge.
- Repeat steps 3 and 4 on both sides of your origami sheet.
- Once all of your sides are folded in half, unfold the top edge.
- Fold in half the left and right sides of your paper, so that they meet in the middle.
- Unfold them and continue folding in half all of your side edges.
- Repeat steps 7 and 8 for the top and bottom edges.
- Fold the front of your paper in half lengthwise.
- Fold in half the back of your paper lengthwise.
- Fold the top of your paper in half to make the head.
- Fold the head in half lengthwise, so that it now looks like a long, narrow triangle.
- Fold the left side of the head over to make the neck.
- Fold the right side of the head over to make the right wing.
- Crease both sides of the left wing in half.
- Fold the right wing over to make the left wing.
- Fold the left wing over to make the right wing.
- Crease both sides of the left wing in half.
- Fold the left wing over to make the left leg.
- Fold the right wing over to make the right leg.
- Fold the top of your paper in half and unfold to make the torso.
- Fold the bottom edge of your paper in half and unfold to make the tail.
- Fold the tail down along its crease line, so that it makes a point.
- Fold the tail up, so that it meets the body at the back.
- Continue folding the head, neck, wings, legs, and tail. Make sure to keep them folded in half so they stay straight.
- When you are finished folding, you should have a completed dragon.
- If you want to add more details to your dragon, like eyes or a mouth, you can do so after you’ve folded your paper.
Conclusion
In conclusion, this origami dragon is a great way to practice your folding skills and have a fun project to show off to your friends. Be sure to follow the steps carefully so that you create a perfect model!